Showing posts with label reduction print. Show all posts

Friday, April 13, 2012

Happy Accidents

It's been a while since I had a steady stream of work time at the studio. My press has been calling to me. I have started another reduction "Calaca" print for my friend, Carlos Barberena's print exchange.
While laying out the color separations I came across a happy accident that I'm going to experiment more with. The marker drawings I made onto the linoleum transferred once I rolled some ink onto the block. The result was a monotype of sorts. The effect looks like I've already printed out the other two color layers. Too bad the marker transfer faded out after a few passes. Still something to consider for future play.

Friday, September 2, 2011

Navigating the Currents

I volunteered to make a print for Inkteraction’s Navigating the Currents: 100 Inkteraction Reactions portfolio. My idea is pretty simple: a printmaker carrying a heavy roller through a binary marsh of 1s and 0s.
This print's requirements were for a smaller 5x7” sheet of paper so the image is pretty small. I chose to further explore color reduction relief printing with my snazzy new registration system. This time I went for a cooler palette than the previous two prints.
(1st & 2nd color layers)
I don't know if it is the changes in humidity or my new block prep that have affected ink layering in a positive manner. In prepping to ink up this block I scraped down the linoleum with the side of a razor. The “La Vida Dulce II” print had some inconsistent ink layers due to what I think was the factory texture of the lino block. Each successive layer of ink picked up on the texture of the layer below and compounded the “orange peel” texture where I had intended flat areas. Of course I rolled with it and used the texture to some advantage but I wanted to avoid this in the future. I believe the shaving/planing of the block prior to inking led to a more even and flat layer of ink. Four layers of blue were laid down to create the print. I debated adding a finishing black line layer. In the end I like the all blue palette.

Wednesday, August 24, 2011

La Vida Dulce take 2


I ordered a new registration system and decided to take another stab at the reduction print at the correct size. I restructured the drawing a bit from the first smaller print.


First color proof, second color block and proof:


The over lay of second color on first:


The third color proof, third color block and third color overlay:


The reduced fourth color block and printed overlay:


The fourth color overlay, fifth color block (now greatly reduced) and the final 5th color overlay:


Finished prints hung to dry:


For comparison, La Vida Dulce I (3 colors) and La Vida Dulce II (five colors).


Tuesday, July 26, 2011

Reduction print (pt.2)

I decided to continue printing the reduction print on the wrong size paper. I'll just have to do another one on the right size paper later. Here is the second color run.


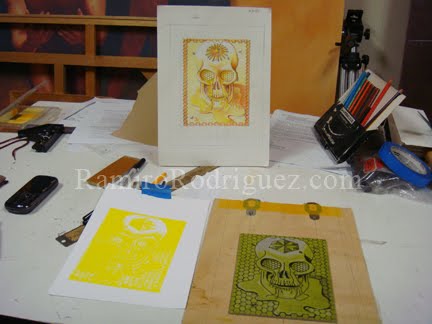
Here is the first color state, second color state and the second color on it's own for comparison.


Here is the third and maybe last color run and the block much reduced.


Friday, July 22, 2011

Reduction print

I’ve got a few pans in the fire.

One: I’ve agreed to make a print for the Inkteraction print exchange with the theme “Navigating Currents: 100 Inkteraction Reactions” due at the end of September. Two: I’ve also been asked by Carlos Barberena and Calaca Press to contribute a print to the “Calacas” themed International Print Exchange. Three: I have a few possible commissions I need to think about.


I’ve decided to try my hand at a reduction relief print for at least one of these portfolio exchanges. I haven’t attempted a reduction print since I was 15 years old and made a 4 color print of Freddie Mercury for my high school art class.

A reduction print is a multi-colored print that is created using one block. Each color is printed in sequentially, usually light to dark. You can start by printing the whole block as a base tone for the print or remove some of the block before inking thereby leaving some of the paper exposed as a base or highlight. Before the second run of color more of the block is removed ("reducing" the block)which leaves some of the first color printed (and paper) exposed wherever the block has now been cut away. This process is repeated until the final color state, sometimes a black but not necessarily so, is printed. The block is destroyed in the process, therefore it is not possible to go back a step and re-do a state. Obviously a little pre-planning and a good registration system is in order for a successful print.


The idea for the Calaca theme came quickly – a variation of something I’ve wanted to do for a while now. First I drew a color sketch then I transferred the image to a block. Next I decided what areas were going to be left white (the color of my paper) and cut those areas away. Next I printed the yellow base color… Then I realized I had used the wrong size paper to print this edition….!!!! (to be continued)